Showing posts with label QRP. Show all posts

Thursday, 20 September 2012

St. Louis Vertical Part 3, Conclusion

© Bob Baillargeon St. Louis Vertical-3593

This is part three, the conclusion of the construction of the St. Louis vertical.

I terminated each end of the twin lead by melting a small hole in between each conductor, large enough to fit a zip tie through and pulled in nice and tight. Then I stripped off insulation from each conductor and soldered them together – did this at each end of the twin lead coil. The bottom shorted conductor is kept bare and I use a good quality alligator clip to attach my coax center conductor. The orange wire is attached to a 17 1/2 foot counterpoise as seen below.

© Bob Baillargeon St. Louis Vertical-3585

© Bob Baillargeon St. Louis Vertical-3587

Here you can see the bright orange stake that I use in the field, along with the bright orange counterpoise so nobody trips over any of this stuff while operating portable.

Using alligator clips allows the use of multiple sized counterpoises to increase the efficiency of the St. Louis vertical while in use.

I carry a second stake with a 40 foot counterpoise. In this configuration the antenna resonates around 6.5Mhz. In a future version of this antenna I’ll add fewer turns of twin lead so it resonates close to 20 meters. I use an LDG tuner, the QRP Z11 along with my FT-817 and the tuner handles this antenna quite nicely.

© Bob Baillargeon St. Louis Vertical-3588

The photo above shows the upper terminated connection with a male/female connector to attach the radiating element that extends to the tip of the Wonderpole. It provides an easy disconnect point for the radiating element.

© Bob Baillargeon St. Louis Vertical-3595


These male/female connectors are available at most hardware stores that carry electrical supplies. I use heat shrink tubing to give all the connections a professional look and I think it extends the life of the antenna components. It doesn’t take long to add that extra finishing touch.


st110s1


The antenna is staked on a ground spike used for beach umbrellas. It is a discontinued item that was available at Lee Valley Tools here in Ottawa. I attach a one inch wooden dowel about 3 – 4 feet long and to that I attach the St. Louis Vertical with large plastic zip ties. At the end of my session I just snip the zip ties off. The zip ties get the Wonderpole nice and snug against the non-reactive wooden dowel and if need be I can hammer some of the extra length of the wooden dowel into the ground for greater stability during windy conditions. I sharpened the end of the dowel for ease of insertion.


© Bob Baillargeon St. Louis Vertical-3589

Here’s the St. Louis Vertical fully extended at the edge of my patio. This antenna is a great portable addition to operating in the field and it sets up in less than five minutes. My first contact was on 15 meters using 2 watts on PSK31 to a station in Slovenia with a 599 signal report.

Please let me know if you have any questions of the construction details.

Wednesday, 19 September 2012

St. Louis Vertical Part 2 of 3

This article is part 2 of the construction of the St. Louis Vertical – a continuation of part 1 that I published a couple of years ago. You can head over to part 1 of the construction article here.

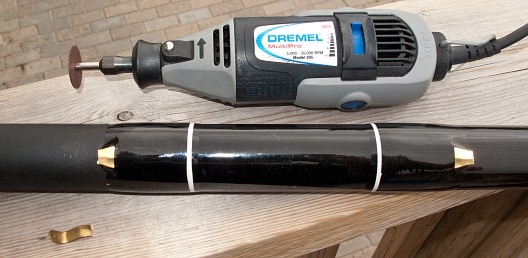
Continuing from grinding down the Wonderpole clips I further grind them down with the Dremel tool so they are flush with the tube; this will allow the twin lead to lay flat along the body and also allow the adhesive to better cover the tubular shape of the Wonderpole.

© Bob Baillargeon St. Louis Vertical-3556

The next step caused me to think very carefully on how to wrap the twin-lead onto the Wonderpole. I had read on various sites describing how hard this was going to be. Some described it as a two man operation to ensure that the twin-lead was wrapped tightly around the pole. Hmmm, this was going to be a problem unless I figured an easy method to accomplish this task. Of course thinking about these last two years I finally came up with a solution. Enter some 3M Indoor/Outdoor carpet tape. Man this stuff was sticky but I think it would hold and as it turned out was an elegant solution. © Bob Baillargeon St. Louis Vertical-3557

The trick was to apply the tape every inch or so, keeping the backing on until I reached the next inch while turning, by hand, the twin-lead. This was hard work and each time I stopped to rest my aching hands I attached a zip tie to hold the stiff twin-lead in place. Eventually I surmised that additional tape was needed so I eventually covered the entire length of the pole as I wound the twin-lead. © Bob Baillargeon St. Louis Vertical-3565

There was still a problem – the stiff twin-lead was pulling away despite the extreme stickiness of the 3M tape. Thinking quickly now as I was at least two hours into winding this twin-lead on the pole. I went to my workbench in the garage where I do the occasional refinishing work on antiques. I use a Black & Decker heat gun to lift old paint from projects I’m working on. I figured if I heated the twin-lead sufficiently it would take on the cylindrical shape of the pole – an it did – it worked great, though I kept the zip ties on just in case.


You can see my progress in the photo below. The white tape backing is removed to expose the sticky backside of the tape; and you can see the zip tie in place while I rest my hands for awhile.© Bob Baillargeon St. Louis Vertical-3561© Bob Baillargeon St. Louis Vertical-3560

I had a good supply of RCA twin-lead that I had purchased about 10 years ago at Princess Auto, a surplus type store located across Canada. Of course halfway through construction I had neglected to figure out how much of the 50 foot length of twin-lead I needed. A quick calculation of number of turn per inch showed that I would have almost five feet left over. That horseshoe was working overtime now…with this important information in hand I continued winding until I reached the end of the pole. I still have a 50 foot length and a 100 foot length set aside for other projects using twin-lead.
© Bob Baillargeon St. Louis Vertical-3564


The picture at the left shows detail of the zip tie and the double sided tape exposed for winding. Every few inches I would fire up the heat gun to meld the twin-lead to the pole shape.

After almost three hours I had completed the toughest part of constructing a St. Louis Vertical and took a good rest before continuing this homebrew antenna.

Part 3 to follow tomorrow.

Saturday, 8 September 2012

How I Mounted the NĂ˜SA TIP1 Mini Paddle

Mounting the mini paddle got me to thinking – it had to be light weight but not too light weight that the paddle would slip about while in use. The mount also had to be at a comfortable height to work just right with my large hands. I also wanted it to be uniquely Canadian.

Usually with projects like this I need a few weeks to let the solution come to fruition. I came up with a unique idea – use a hockey puck; it’s cheap, has some weight to it and it’s Canadian, eh? It fits into my ‘go’ kit quite nicely and it’s durable. A visit to Lee Valley Tools here in Ottawa provided the pucks and some high friction adhesive discs for a very reasonable price – a dollar for the pucks and just a few dollars for a bag full of discs. The pucks aren’t quite kosher Canadian, being manufactured in Slovakia now, but they are ‘regulation’ size. As you can see the adhesive discs fit perfectly on the puck and prevents slippage on just about any surface.© Bob Baillargeon 2012-3537© Bob Baillargeon 2012-3538

© Bob Baillargeon 2012-3532

© Bob Baillargeon 2012-3535


© Bob Baillargeon 2012-3549

And finally a last picture of the FT-817 propped up with the $2 iPad adjustable stand from my previous article of a few days ago. Also note the front antenna connector is terminated with a 50ohm resistor left over from my network installation days. This is to protect the finals in the event that I forget to switch the antenna from front to the rear antenna port.

© Bob Baillargeon 2012-3553

All photos for this article were taken with the Canon G10 in RAW format and post-processed in Adobe Photoshop Lightroom for colour adjustments and cropping. Irfanview was then used for reducing the photo size and sharpening for efficient use on this blog. This will be the topic for a future article.

Friday, 31 August 2012

Take A Cool Stand

NUE-PSK modem stand1

A few months ago I happened to be at one of the local Dollar Stores. They do have some interesting end of line and overstock items for sale especially in their electrical and electronic aisles.

I have a NUE-PSK modem and compact keyboard combo for QRP portable ops with my trusty FT-817. It was always a pain propping the NUE-PSK modem at the correct angle for viewing the LCD screen until I found this iPad stand for the sum of $2CDN. It was a perfect fit for the modem and I could adjust the angle for best viewing.

I’ve seen these for sale on the internet for well over $20CDN so the Dollarama price is a steal. The stand is very well made – rubber coated steel so it is slip resistant and the locking knobs to a decent job of staying in position once locked. It’s a useful stand and can be used with a variety of QRP radios making it easy to see and adjust the various knobs from a comfortable angle.

© Bob Baillargeon-3249


© Bob Baillargeon-3255

© Bob Baillargeon-3258

© Bob Baillargeon-3262

You can see the detail close up to the right. Works great and I’ve got a couple of extra for future projects.

The NUE-PSK modem has been great for portable QRP operation. It is field upgradeable via a USB port and can be used in BPSK (PSK-31), QPSK, RTTY and CW. There are regular upgrades of new features and bug fixes from the NUE-PSK Digital modem website.

The modem and keyboard are powered from either and external 9V – 12V supply. A USB dongle is able to log call signs and QSOs so they can be transcribed to regular logs. The new Version 5 firmware adds a CW keyer to the modem. All in all it’s a nice portable package and frees you from lugging a heavy laptop to do digital modes in the field.

Sunday, 19 September 2010

OVQRP Weekend At Rideau River Provincial Park

It’s the weekend and not a drop of rain. The weather is cool at night, dropping to 6C last night at the campground on the Rideau River near Kemptville.

Members of the Ottawa Valley QRP Society (OV-QRP) group are still out there tonight working qrp and some really great DX. Bill VE3CLQ worked France and Zagreb Croatia with 20 watts and 10 watts with his Buddistick antenna and his Yaesu FT-857. Goes to show that even with low sunspot numbers you can still work some great DX with low power. Martin VA3SIE, Mike VE3WMB and Jim VE3XJ did kitchen duty.

Here are a few pictures of this weekend’s event on the Rideau >

© VE3MPG  -2735
© VE3MPG  -2736
© VE3MPG  -2737
© VE3MPG  -2745
© VE3MPG  -2746
© VE3MPG  -2748
© VE3MPG  -2750
The group will operate through part of Sunday and it was a good effort and not at all a contest type operation. 

Friday, 9 July 2010

Late Night DX On 20 Meters

It’s out there. Last night saw me re-connect with Bill, ZL3NB in Christchurch New Zealand at 0437Z. His signal was 599 and his report to me was the same. There was some QSB but armchair copy using Ham Radio Deluxe and PSK31. My output was set to 25 watts and again this was using my Cushcraft R6000. That’s a distance of 8835 Kms or 14218 miles. Not bad for a low power digital QSO.

ZL3NB_Bill

I had originally worked Bill in April of 2004 and I happened to be one of his first digital contacts at around the same time at 0358Z six years ago. It was nice re-connecting with Bill. He worked a couple of more stations after my QSO and then called CQ for a long time. It was time for bed knowing there was lots of DX floating around despite the low sunspot numbers.


ZL3NB_Station

Bill’s ham shack in New Zealand. The main equipment consists of a Kenwood TS2000 and TS530S (Classic setup with the VFO240 and SP230) along with a Ameritron Amp. Antennas consist of a Mosley TA33 tribander and inverted vee's for 80/40 and 30 meters.

I suspect there’s more DX at that time of the morning, rolling in from the South Pacific area – I just ran out of steam and had to pull the plug.

The steamy heat wave enveloping Ottawa finally broke early this afternoon with some rainshowers and thunderstorms. Temperatures plummeted to +23C and power went out for a few short seconds. It’s time to leave antennas disconnected and grounded before these intense summer storms move into the area. It’s good practice and could save you a bundle if there’s ever a lightning strike close by.

For more info on Christchurch go to: www.christchurch.org.nz

Saturday, 22 May 2010

Just When I Thought It Was Safe

You know, I’m a cautious kind of guy. I know that every activity is fraught with peril but little did I know that QRPers were nut jobs. Yes that’s the new diagnosis for being passionate about low power operating or better known as a QRP operators. Now the professions who treat psychiatric disorders have a new (un)treatable disorder on the books. Read this post by KE9V on his blog titled “Low Powered Nut Jobs.” Now I must get this news out to the Ottawa Valley QRP Society.

Friday, 30 April 2010

St. Louis Vertical Part 1 - Prep

© VE3MPG_ST. Louis Vertical-3 The St. Louis Vertical portable antenna has been talked about and modified over the years. It’s a very portable antenna solution for Field Day or QRP enthusiasts. It’s easy to build and modify and covers 40 meters to 10 meters with the use of a tuner. Radials are a must with this type of antenna. I use a Shakespeare Wonderpole, a collapsible fishing pole. Fully extended it’s 20 feet long and collapses to 45 inches for storage and transport.

Years ago I purchased a good amount of Radio Shack twin lead for this project and like any good ham I’m finally getting around to building a St. Louis vertical for use at Field Day and with the Ottawa Valley QRP Society group outings.

© VE3MPG_ST. Louis Vertical-1 © VE3MPG_ST. Louis Vertical-2 The first preparation that must be done on the Wonderpole is the removal of the two clips midway up on the first section. These two brass clips are used to hold a fishing reel. The reason for removing these two clips is to assure that the twinlead once wound on the lower section is flat against the bottom section when you wind it on. It’s more esthetics and it makes it easier to wind without the bumps of the clips underneath the twinlead.

© VE3MPG_ST. Louis Vertical-4

I used a Dremel tool with a cutting disk attached to cut through the clips. I still have to smooth down the plastic adhesive used to attach the clips with a small grinding tool attachment on the Dremel.

For the last while I’ve been thinking quite hard to determine a good way to wind the twinlead onto the bottom section so it stays in place. In part 2 of this series I’ll show you a novel method that I devised to accomplish this – it’s weatherproof too.

A71EM in Quatar Have been listening to 17m psk this afternoon and just finished working A71EM in Qatar with 40 watts on the R6000 vertical. 17 is a fine band with some great DX and quiet band conditions – opportune for working DX. It seems to be open early morning till sundown here near Ottawa – always with some exotic stations waiting to be worked.


Here’s a link from the American QRP Club describing the St. Louis Vertical:

AMQRP.ORG St. Louis Vertical

Sunday, 25 April 2010

QRPTTF A Success And Great Social Event

© VE3MPG_QRPTTF-1-4

The QRPTTF event yesterday at Hampton Park in Ottawa, was a great success. The bands were in terrible shape and lots of electrical noise pollution on most of the bands. Turns out it was more of a social event interspersed with working a few stations. The weather was great – not too warm with a light breeze. Many locals and dog walkers stopped by to investigate what we were doing and most had heard about amateur radio. Here are a few pictures of the ops and stations and some of the visitors. Forgive me if I miss your name and call.

© VE3MPG_QRPTTF-1-2© VE3MPG_QRPTTF-1-3 © VE3MPG_QRPTTF-1-5 © VE3MPG_QRPTTF-1-6© VE3MPG_QRPTTF-1 © VE3MPG_QRPTTF-2© VE3MPG_QRPTTF-7 A great time operating QRP in the park. Michael provided hot coffee and mini muffins – the kind where you can’t eat just one. The Ottawa Valley QRP Society members are a great bunch and I hope there are more in-the-field type QRP events this year.

Tuesday, 30 March 2010

QRP DX

Operating QRP these last few days has been fun and a challenge. I can work lots of DX with 5 watts from my FT-817. Most stations don’t know I’m running 5 watts until my brag macro informs them. I run digital modes 100% here. The challenge is that many stations run excessive power; some run dirty signal that wipe out the psk segment of the bands I’m working on. Here’s a screen shot of a Cuban station with sidelobes so strong the band segment was wiped out up here in Ottawa. Setting up your station for proper operation using digital modes takes some effort. Excessive power into yagi, verticals or dipole antennas isn’t necessary; it’s important to monitor ALC (assure that the ALC setting of your S-meter shows no movement) when ones changes band and even moving within the passband where you’re operating. Proper adjustment and judicious use of RF output makes it a whole lot easier for everyone using the narrow psk segments of our shortwave bands. signal sidelobes Of course the little FT-817 doesn’t play as nice as the Ft-950 – I have no filters installed and there are no DSP controls to make things easier on digital modes.

Working QRP is a challenge; I usually wait until a station signs off with another station and then I call them and usually that gets me the DX. When you’re working with 5 watts you want to make sure all of your power gets out to the antenna. That means no antenna tuners. Make your antenna resonant for the band you’re working. 99% of the DX stations I’ve been working give an honest 599 report with a few 569 reports so my setup is doing something right. I always make use of an antenna analyzer to check my antenna a few times a month to make sure all is working as it should.

Here are a few stations worked from my QTH in south Greely – FN25fe – F5FMO, PA3HDG, RA3FO, G0UAN, ES4MM, 2E0GHQ, SM0EJR and RA6AN. Some of these stations are well over 7,000Kms away yet with 5 watts most gave consistent 569 - 599 reports– there was the odd dropped character due to fading and interference from strong stations but the DX is out there – you don’t need a lot of power and it’s fun once the other QRO station finds out you’re only running 5 watts to a vertical antenna. I’m able to work both strong and weak stations – it doesn’t seem to matter too much.

FT817 on dash I have plans to order a CW filter to install in the FT-817 to make things a bit easier. I also plan to do some portable operating like I did almost ten years ago when I first got the 817. I used Hamsticks in those days with a large magnetic mount. Hamsticks work very well when conditions a good but they did get the job done during Cycle 23.2001 Corolla with 17m Hamstick

QRP Blogs and Websites via K4UPG.com

QRP Amateur Radio Club International